


[231] TRESTLE TABLE Part I (Base)
Posted: jueves, 15 de septiembre de 2011 by Superhero!! in
2
Today is a holiday here in México. Tonight we celebrate our Independence day. I'll eat pozole and to drink lots of tequila: Viva Mexico Cabrones!!!. So, tomorrow I will not be able to write any post, or hold a saw, chances are I won't be able to get up from bed.
.
The trestle table project will be in standby... The table top is already assembled, but in the middle of the finishing process. However, the base is already done... And only the base is enough to write a post.
.
.
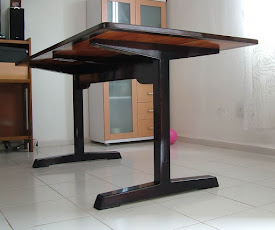
Trestle table (the base)
Each end of the trestle table has a foot, leg and brace. And these end assemblies are joined by a long stretcher. The leg and foot are joined by a wedged through-tenon. The brace and leg are joined by a bridle joint. And the two end assemblies attach to the stretcher with a big wedged through-tenon.

.
.
13 months ago a company built a new lane in the street where I live. Unfortunately, a huge mahogany tree was in the way of this new lane. Bad news was that the company decided to remove such a beautiful tree instead of build the new lane around it. Good news are that the company threw away the log and I was able to reclaim lots of lumber... For free!!. My friend Rosalino brought a chain saw and helped me a lot.
After 13 months I decided to use that lumber... and to build a trestle table.

.
.
My first major challenge was to cut that timber into manageable pieces. It has an odd shape and was too heavy for my ridiculous benchtop table saw. So I used a circular saw to start with a kerf as deep as the circular saw was able to cut. Because the odd shape of the timber I wasn't able to cut another kerf from the other side (faces not parallel). So, there was almost 1.5 inch left to be cut with hand saw. That was tough, and I finished that job riding like a cowboy.

.
.
Once I had a manageable size, the next step was to flatten one side. I used my fore plane (jack plane) to plane off the high spots until the board was reasonably flat. Then I pass it through the thickness planer with the approximately flat side down. After that, flip the board upside down and pass it through the thickness planer again to smooth out the approximately flat side.
Once the faces are true and parallel, I worked on one edge to get it straigth and squared -but I forget that picture.

.
.
With one edge straight and square I was able to pass it trough the table saw to cut the workpieces to width. I considered 1/16th wider because I like to give a final light pass through the thickness planer to smooth it out. After that, I cut the workpieces to final lenght with my miter saw.

.
.
From left to right:
1. The brace and leg are joined by a bridle joint
2. The leg and foot are joined by a wedged through-tenon.
3. End assemblies dry fitted.

.
.
At this moment, the end assemblies looks like a simple "H". It needs some details to transform it into something more interesting to look at. I cut tapers on the feet and brace. Then I crosscut the ends of the feet at 25° using a miter saw. I also cut a relief on the bottom of each foot to create two pad feet on each foot -not pictured.

.
.
Wedging a mortise and tenon joint is something I have never tried before. And I found that it is something really easy to do. Wedges: First I need to make some wedges, I selected Dzalam wood because it can take a beating without spliting. The wedges are 8° taper, thats really easy to do, just set the miter gauge in my table saw at 4° and turn the blank upside down after each cut. Kerfs: I cut two kerfs in the tenon located 1/4" in from the edge cheeks and run 3/4 of the way down to the tenon's shoulder. Mortise: There is a slight trumpet shape in the mortise so the wedges will spread the tenon at the wider opening. Simply chisel away a little from the two ends of the mortise where the tenon exits. Cleaning. I let the glue dry overnight, then I cut the waste using a chisel to get the tenon flush matched

.
.
After a roundover on every possible edge I do a final dryfit just to be sure every thing is ok before gluing the long stretcher. The two end assemblies will be attached to the stretcher with a big wedged through-tenon. At this time a pair of small hands came to help :)
 .
.

.
As you can see in the top first picture, I decided to dye the table base. Why?
.
This mahogany wood came from an urban tree -as I mentioned above. Urban trees usually grow under a lot of stress, and that is reflected in the wood. I found some injuries, and a very wild grain. The wood shown too many details that may distract the attention from the main element: the table top. So I decided to standardize the color of the table base and make it more discreet
..
.
The tabletop will feature two gorgeous boards from the same mahogany tree, a beautiful Ziricote end trim and breadboard ends, so stay tunned.
.
.
Nos vemos luego!!
.


