


[220] KIDS TABLE
Posted: martes, 5 de julio de 2011 by Superhero!! in
0
Two years ago, I built my first woodworking project. It was a cradle for my daughter. I owned only a few basic tools that fit in a backpack, but my enthusiasm was big enough to compensate the lack of tools... and skills. That cradle took me an incredible amount of time to get it done. I had to solve a lot of woodworking mysteries!!
.
Today I own more tools (never enough ha ha ha) and more woodworking skills. My daughter is growing very fast, wich means more furniture required -that I'm very pleased to build-. This time, I built a kid's table in just a few days...
.
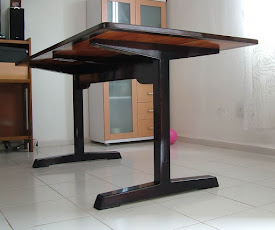
Kid's table
.
This project is based on Matthias Wandel post. He designed and built the children's table using his own amazing jigs and machines: A wooden bandsaw, slot mortising, tenon jig, table sled, router lift (and more). One year ago I purchased his router lift plans, they are very nice and detailed. Building the router lift was a learning experience for me.
.
For the kid's table I use the same design and proportions described in their free plans. Despite his detailed description on how to build it, I have to work my own way. I don't have a fully equipped workshop, so I need to figure out how to perform certain tasks according to what I have.
.
![]() .
.
.

To make the top I used almost all the wood in my scrap bin. This is an idea that ocurred to me from here. I ripped all these strips the same width, then glued up to make a long board 10" width that I can pass through my thickness planer. However, matching the grain direction on each strip is almost impossible. It's good to have a belt sander handy.

I crosscut that board and then glued up again to make the top. I also added a hard wood trim around the edges. For the edge grain I simply glued up face to face. For the end grain I used a tongue and groove joint, but I forget to take that picture, oops!. I hope the end trim pieces add strength, I wonder if seasonal wood movement will be an issue. For a perfect fit I used the trick of relative dimensioning.

While the stock still square, I cut mortises on the legs. I wish I had a fancy mortising jig, instead I use this approach on my router table. I did very light cuts moving the stock over the router bit until hit a stop block clamped to the fence.

I have plans on building a tenon jig. I found a really simple design on the web, but I have been lazy. In the meanwhile I keep cutting my tenons using my table saw sled. The most-left clamped block has a drywall screw for microadjusting. The next clamped block to the right is for resting the workpiece. And the most right free block is for pushing the workpiece tight while the sled passes through the blade.
This works fine for short-medium workpieces, It isn't super precise but it's acceptable. Some paring is usually needed. I have no problem on that.

.
Cutting the tenons shoulders is quick and easy after a quick setup.
It's good to keep some scraps handy for test cuts.

I have a lot of jigs in my To do list. One of them is a taper jig. The point here is I cut tapers very sparingly, so I refused myself to build a fancy one. But when you need a jig... YOU NEED IT. I came up with this quickly (and disposable) jig to cut the tapers on the legs. Its a simple sled running against the fence, supporting the workpiece at the correct angle. It is based on this tip

.
I layout the cutout on the bottom edge of the apron rails the same way Matthias did. I also used a can of WD-40 to mark an arc on the top's corners to round them off. (That's high tec!!). But instead using a bandsaw, I used a scrollsaw.
I used my router table (equiped with my router lift) to round all edges... piece of cake!!
The glue assembly described by Matthias is very straightforward, I was able to follow it exactly the same way.

.
I applied oil-based polyurethane varnish to bring out the wood’s natural color. I brush two sealing coats, let it dry all night long, then use a card scraper and/or sand paper before moving on. Finally, brush on three thin coats of finish to get a smooth, glossy surface. I hope this varnish keep moisture away and reduce seasonal wood movement issues.

Ahhh, por cierto.
Espero que mi Ingles barato no cause demasiadas carcajadas.
Estoy redactando mis post en ingles porque creo que es una buena forma de practicar.
La practica hace al maestro ¿a poco no?
Aún tengo mucho que aprender... de ingles y de carpinteria.
See you latter!!!