[229] WAGON VISE

Posted: lunes, 29 de agosto de 2011 by Superhero!! in
5

Sometimes a single theme seems to be everywhere, you'll see...
1. Yesterday I read this post about wagon vise design.
2. Today I got an e-mail with a comment from somebody else about my own wagon vise.
3. Today I found this post about living without any vise on the workbench.
4. Today I noticed several visits to this post, here in my blog, where I partialy show my wagon vise
.
And then it occurred to me to write a quick post with some details about my wagon vise.
And yes... this is another english exercise for me, remember I'm a spanish speaker, my english have a lot of mistakes and may be you can't understand me, so I try to compensate with a lot of pictures.
.
WAGON VISE

I live in a region where buying a nice wagon vise is not possible. Hardware stores in my town are far far away from selling specialized woodworking hardware. Buying in internet was a choice, but international shipping charges are to high. And there is no fun on clicking a mouse to get a tool, I prefer to click on my power tool's trigger to build my own stuff.
 .
.
.
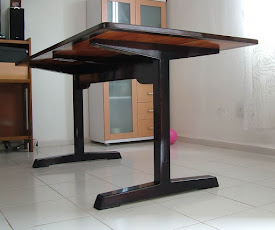
When I glued the strips for my table top, I considered 5 strips shorter to get a proper space for the wagon vise. Once the glue was set, and after flattening the table top I cut an edge rabbet on the bottom of the table top. I used a straight bit mounted on my router and then used a chisel to square the ends. Note the groove on the end grain of my table top, I'm going to install a tongued end trim there, but not yet... more on that latter.
(Here you are looking the bottom of my table top)

.
.
I needed the help of a blacksmith to weld this sort of guide. It's a standard nut welded to a flat steel bar. There is a hole in the flat steel bar so the threaded rod will engage the nut and pass through that hole without binding. I painted the guide black (against rust) and drill countersunk holes for mounting screws. I don't how to call this piece, so let's call it as guide nut... :$
.
.
The bench dog runs mounted between two steel runners. The two runners are flat steel bar with countersunk holes for mounting screws, that way I'm going to be able to disassemble the wagon vise if any bad thing happens in the future. I cut the grooves in the bench dog on the table saw, I used an external blade from a dado set. I was afraid about binding but the bench dog ended running very well and no lubricant was needed, just a loose fit.
 .
.
Do you remember the tongued end trim? I need to do some work on it before installing it.
I drilled a hole with a forstner bit at the drill press because I wanted to be sure it was perpendicular. The hole is the same diameter as the hole in the flat steel bar, -behind the welded nut. That hole size should allow the threaded rod to pass through freely.
.
.
After installing the end trim I used the previously drilled hole as a guide to complete the hole through the rest of the wood. In this case I had to use a spade bit because the forstner bit was to short
.
.
The threaded rod will pass through the previously descripted hole, it will be fix in place with the "guide nut" and then will met the bench dog.
How does the threaded rod met the bench dog? I believe this picture will explain much better than me.
.
.
I used a standard threaded rod, so I will need a lot of turns to move the bench dog from one position to another. So I drill two dog holes in the bench dog because it is faster to move the bench dog than to wind the screw. I'm glad I did that.
 .
.
Another great feature on my wagon vise is the big wooden wheel.
The nut in the next picture is locked in place with a removable pin. The pin is the shank of a longer drywall screw (I cut off the threaded section). The pin sits flush in a countersink hole. I chiseled the shape of the nut in the center of the wheel just half of the width of the wheel. The wheel is locked in place with a washer and a nut -from the other side.
I love this wooden wheel. I only need to give it a hard push/pull and it will remain spinning a while -doing the most of the winding job thanks to the inertia.
.
.
I positioned the dog holes in my table top with not so much space between them. Do you remember the two holes in the bench dog? I have plenty of dog holes so I don't need to move the bench dog a lot. And that's the best part!!!


.
.
 I'd like to hear what you think...
Nos vemos luego!!!!

[228] SPICE BOX (part IV) FINISH

Posted: martes, 23 de agosto de 2011 by Superhero!! in
1

Finally, last week I finished the Pennsylvania Spice Box.
.
I decided to build this project because I liked the design and proportions, it also interested me because its a reproduction from an 18th century spice box. But the main reason I was motivated to build this project was that I noticed a few techniques that I don't know. So I had to search for info, learn about and work on it in order to complete this project: Resaw wide boards, hand cut through dovetails, hand cut half blind dovetails, ogee bracet feet, mouldings and a nice double arched door was new stuff for me. This project was a challenge for me, I enjoyed it, and I learned a few new techniques...
.
.
PENNSYLVANIA SPICE BOX
.
I decided to use mahogany for this project because I don't have acces to curly maple. Here in southeastern Mexico I can find a lot of native exotic wood species, they all are so beautiful and relatively cheap but in most cases they are so dense and work with them can be tough, (specially if you are learning new techniques). Mahogany is easy to work with, so I decided to go on mahogany. But I'm a little sorry I made that decision, by the end I'm just a little dissapointed about how the color and grain turn out, specially if I compare my finished Spice Box with the one showed at Popular Woodworking Magazine.
.
.
For the hand cut through dovetails that join the main carcase I did some changes. The original plan by Glen Huey indicates to lay out the tails on the sides and the pins on the top and bottom and I'm sure that that is the right way to do it, but that configuration results in a boring series of rectangles on the upper show face. If I'm going to dedicate time and effort in dovetails I would like to show it off, so I decided to lay out the tails on the top and bottom so I can say very proudly: Look at my dovetailed joint!!!.

.
.
There are 11 drawers wich means 22 half blind dovetail joints at the front and another 22 through dovetail joints at the back of each drawer. All of them made by hand. Dang... that was a time consuming task. It took me around 2 days to complete only the half blind dovetail joints for the fronts of the drawers... then I gave up myself and cheated on the joints for the backs. I power up my table saw and my router table and joined the backs and the sides of each drawer with a locked rabbet joint in just a couple of hours.

.
.
To cut the arches for the double arched door I looked for my biggest hole saw but it was 1/4" smaller than the size in the original plans. I had to choose between a right sized -but not perfect- semi-circle with my scroll saw or a smaller semicircle with my hole saw. I choosed the smaller and perfect semi-circle with the hole saw.
I have a set of frame-and-panel router bit and it ocurred to me to use the "female?" router bit from that set to cut the slot for the panel and the moulding at once. (in several light passes, of course)
.
.
I have already described how I dealt with the ogee bracket feet in this previos post.
Mouldings: I followed Glen Huey's directions from the article in the magazine to cut thicker mouldings from a smaller router bit and everything worked fine but...
When I went to the hardware store to buy the router bit I picked up the wrong one. It doesn't make any sense to spend more money and buy another router bit just to match the identical profile like the one used by Glen Huey, so I used the one I have already bought. By the end my mouldings are... mmmh?... just a diferent model.
.
.
The back of the Spice Box is nailed to the sides... 
.
.
There is a secret compartment behind these drawers... Check this out:
Uh, may be it's not a secret anymore... ups.
.
.
And the center drawer also have a secret compartment. A false bottom.
(The drawer is upside down...).
.
.
The whole project took me three weeks. The first week I dedicated only a couple of hours a day after my office job, but after that I got two weeks of vacations, so I had plenty of time.


Pennsylvania Spice Box... Done!!
.
.
.
You can also read:
Part IV: Finished project

[227] SPICE BOX (Part III) OGEE BRACKET FEET

Posted: martes, 16 de agosto de 2011 by Superhero!! in
1

I have already finished the Pennsylvania Spice Box project. But before showing the pictures on the finished box, I'll write one last post about another new technique that I had to learn. This time is the case for Ogee Bracket Feet.
.
OGEE BRACKET FEET
.
I started the ogee bracket feet construction by drawing a template. I drew it in AutoCAD program and printed in autoadhesive paper. Then I stick it to a scrap piece of plywood and trim it at the scroll saw. The idea is to get a template that I can use more than once. I also milled four blanks, each one will yield two feet halves.
.
.
I worked the joinery in pairs because working with longer pieces is easier than working with short pieces. I tilted my saw at 45° and cut a miter on each end. With the saw still at 45° is a good idea to cut a groove for a spline, just adjust the saw blade's heigth and make some test in scrap wood.

.
.
Use the template to transfer the shape on the workpieces, be sure to keep the template tight to the edges. I had to do some eyeballing to find the center of the semi-circle that forms the spur and draw a dot in place.

.
.
Next step is to cut the feet halves. First use a forstner bit to drill a hole in order to get a sharp spur (using the eyeballed dot), then finish the cutting job at the scroll saw.
.
.
Note the grain direction on the spline. The spline is a great help to keep the pieces aligned but I didn't find an eficiently way to apply clamps... The ogee shape is very odd for clamps... Dang, that's a huge and embarrasing gap, fortunately is not a show area so nobody will see it.
.
.
The outside face of the feet has a particular profile, one part is concave and the other part is convex. With a band saw this should be straightforward, my problem is that I don't have a bandsaw. So I scratch my head and then it ocurred to me to cut the concave part of the profile using the cove cutting technique. This worked very fine so I was very proud of my discovery, unfortunately after a couple of days I found this article in the web, so my discovery wasn't new.  dang!!

.
.
But still had to solve another problem. There's a convex part to be done to complete the profile. What to do? I scratched my head again but nothing happens. So I got a beer, then another, and another and... vualá!! Inspiration arrives. Lay out some lines and then used my block plane to cut a "big chamfer". Check this out:

.
.
With the "big chamfer" finished the next step was to "soften" the profile. A few additional passes with the block plane, a little sanding work and I was done.
.
.
Once installed, the ogee feet should be reinforced. I glue up a vertical wood block to carry the load and two horizontal ones to reinforce the grip of the feet to the box. It looks odd to me, but I found similar approaches like this on the web so I believe it's right.
.
.
I know my ogee feet are not perfect. But I enjoyed exploring and learning this techinque,-this is something I had never done before-. My ogee bracket feet are good enough for me and that's all I need. :)
.
.
.
You can also read:
Part III: Ogee bracet feet
Part IV: Finished project


[226] SPICE BOX (Part II) HAND CUT THROUGH DOVETAILS

Posted: sábado, 6 de agosto de 2011 by Superhero!! in
0

Continuing the Spice Box project...
.

The main box joinery is supposed to be hand cut through dovetails. I have never work on something similar and didn't know anything about dovetails. At some point I thought a simpler joinery made by power tools could do the job but... Where is the fun on that?, So, I took the challenge and learn something new. I found some impresive videos like this on youtube where some expert people cut dovetail joinery in 2 minutes. I also read a lot of web pages about dovetails. By the end I decided that this is the metod that could work best for me, so I tried.
.
.
HAND CUT THROUGH DOVETAILS
.
My first step was to mark a line to indicate the width of the boards on every mating piece. I decided to do this on both faces -inside and outside- because I needed as much guide lines as posible. There are a lot of options to do this, a marking gauge, a marking knife, a chisel, etc... I choose a common mechanic pencil -0.5 mm wide tip-, and the mating piece itself for maximum accuracy
.
.
.
Tails or pins first?. I believe that's a personal choice, and I choice tails first. I found a lot of diferent layouts, diferent tail sizes, and some variations on the tails angle. Some experts cut the tails without any layout, and some other uses specialized jigs. I find my own way whit a sliding bevel and a combination square.

.
 .
My jaws hit the floor when I discovered that premium dovetail saws can cost up to $200 USD. No way I can get one of those, not only because the money, that kind of nice tools are not available where I live. So I have to use what I have on hand. I took this cheap back saw that came with a yellow miter box, it's 12 TPI but the saw set was to wide for dovetail cutting. It occurred to me to reset the teeth by filing them whit a sharpening stone. Believe it or not it works. I was amazed with the clean kerf, regardless I must steer very carefully to avoid binding.
Points to remember: Hold your saw like if it was a little bird, use little or no downward pressure and always saw on the waste side of your line. Am I right Mr. Schwarz?
 .
 .
This is an easy step. Just grab a coping saw and remove as much waste as possible. Just be carefull not to touch the base line.
.
.
Then with a chisel remove the remaining waste working from both sides. I found that with little waste to be removed, and a very sharp chisel, there is almost no need of a mallet, just use my own weight to sunk the chisel down. I learn that in this step is very important to cut on the waste side of the line, don't touch it!!
.
.
Once the tails are finished, next step is to draw the pins on the edge of the mating piece. Clamp the mating piece leveled on the vise, then use a block at the same height in the rear side and lay the other piece with his tails on the clamped piece. Be sure everything is perfectly aligned, be sure not to move the tailed piece and draw the shape of the tails on the edge of the mating piece.
.
.
Complete the layout on the sides. Mark the waste areas with a BIG equis, then make your cuts using the same technique used on the tails.
.
.
The joint should be tight but without binding. My first joint was too tight and doesn't fit because I did my cut a bit far away from the cut line, so I had to do a lot of paring. On the other three joins I corrected that problem, I still had to do some paring but much less than the first joint.
.
.
After I get a nice dry fit on four corners I was ready for the glue up. First I put some masking tape on the inside corners to catch any glue squeeze, then I used band clamps to keep the box tight while the glue dries. Meanwhile a big Corona beer comes in handy...

.
.
When the glue dried I used my smoothing plane and a low angle block plane to trim and clean the protuding tails and pins. Then I sanded the whole box to 180 grit and I was done.

.
.
I am happy with the results. The joint looks fine, it is very strong, and I learned a new technique. The only downside is that each joint took me around one hour -up to the dry fit. I hope to reduce the amount of time in future joints.
.
.
Nos vemos luego!!
.
.
.
You can also read:

Part I: Resaw wide boards
Part II: Hand cut through dovetails
Part III: Ogee bracet feet
Part IV: Finished project