[224] SPICE BOX (Part I) RESAW WIDE BOARDS

Posted: viernes, 29 de julio de 2011 by Superhero!! in
0

I received the August 2011 #191 issue from Popular Woodworking Magazine at the doors of my house a month ago. The cover project is a Pennsylvania Spice Box. It's style, design and proportions captured my attention. Then, while I was reading the 8 pages article, I noticed some techniques I haven't tried ever. That project looks like a fantastic challenge for me, so I started to work on it last weekend.
.
Picture from Popular Woodworking Magazine...
.
Because this is a large project for a single post, I'm going to divide in 2, -may be 3- parts. By the way, I'm going to write only about the new techniques I had to learn to acomplish this project. I was tempted to write a full review, step by step, but I believe it isn't a good idea. That was the job of PWM.
.
.
RESAW WIDE BOARDS.
For the whole project I bought 3 rough boards 1 in. thick (mahogany). Since the shelves, dividers and door panels are 1/4 in. thick, it's obvious that I needed to do some resawing. Because my lack of  bandsaw, I always resaw on the table saw working in two passes. This way I can resaw up to 6 in. wide panels, no more. My first challenge was to resaw 7-1/2 in. wide boards for the shelves. What to do?. 
Take your boards to a proffesional workshop and pay for the service... or...
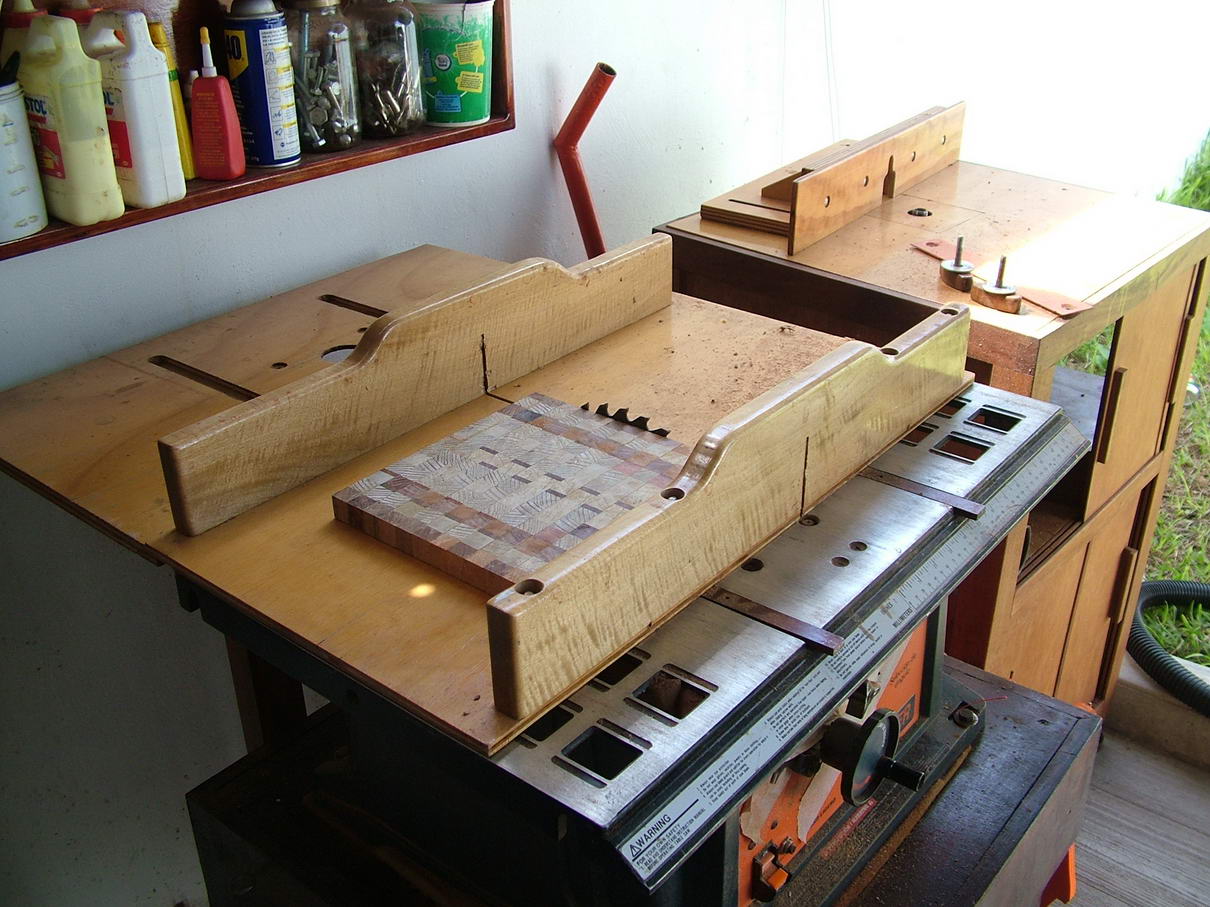
Cut two kerf 3 in. deep on each edge like shown in the picture below. Note that the clamps are applying pressure at the no kerf zone.
.
.
Then use a hand saw to complete the cut. Both kerf helps to guide the saw, and with only 1-1/2 in. remaining stock to be cut, this is really fast and straightforward. I feel me silly because this is something that I didn't figured out before. Oh, and I had to buy a hand saw, I never had one of those, until now...
.
.
This is what the boards looks like after resawing. There is some remaining material at the center because the hand saw have a thinner kerf than the table saw. Note that this is my first time using a hand saw.
.
.
Next step is to do some clean up with a fore plane, followed by jointer plane. I'm also learning a lot about hand planes and using them more. I began to feel comfortable with hand tools, but I will never say good bye to my power tools.
.
.
The boards are around 5/16 in. thick. Their final dimension will be 1/4 in., but before getting them to final dimension I will wait a few days, meanwhile I keep them between sticks to allow air flow.
I'm novice using hand planes, and I like to use them as much as I can, but in this case, I'm sure I will use my power thickness planer to get my boards on final dimension.
.
.
You can also read:
Part I: Resaw wide boards
Part III: Ogee bracet feet
.
.
Nos vemos luego!!!

[223] STEP STOOL

Posted: jueves, 21 de julio de 2011 by Superhero!! in
8

When I saw this project in Popular Woodworking Magazine I knew I had to build it. It is under the "I Can do That" seccion, it's an easy project. In fact, it's too easy for me, no challenge, no new technique, but I liked the design, it's a cute step-stool for my daugther. So, what the heck... let's build it.
.
STEP STOOL
.

.
.
A couple of years ago a mahogany tree was felled because an hurricane at a parcel that belong to my friend Oscar. He cut the log into manageable sections and ask me to take it away from his yard. I was happy to get wood for free. I'm not skilled to use a chainsaw but I did my best.
.
.
I know there are simplest ways to flatten a board, but I already have this sled, and I'm used to use it. I can get dead-flat boards without any fuss.
After one face gets flattened, I turn it over and pass it again trough the thicknesser planer without the sled.
.
.
I recently bought digital version of Handplane Essentials by Christoper Schwarz. What a great book!, I am learning a LOT so I'm starting to use my handplanes more often. Here I'm straightening one edge. The sound of a well tuned handplane is unique.
.
.
Once the faces and one edge are true I simply use my table saw to rip the board to width. Yes, I know, I know, it's a small benchtop table saw... I have an eye on a bigger tablesaw, from Makita... but I'm just dreaming...
.
.
This is what the boards looks like after rough cut. Dimensions are not final. I Usually do the rough cut 1/8" or 1/4" oversized on the table saw. This time I had a lot of leftover lumber (marked with an "X")
.
.
For this project I go the easy way. I trim my workpieces to final width by using my thickness planer. My workpieces will match their exact width with ease, but the edges probably won't be perfectly squared, in this particular project that doesn't matter.
.
.
Quick and easy: I cut to final length on my miter saw. Piece of cake.
.
.
When all my workpieces are on final dimensions, I cut a roundover on every posible edge. This is also a piece of cake on my router table. Have you noticed the router lift mechanism?
.
.
For this project I needed two dowels 30" long. I already have dowels in my workshop, but their diameter was a bit larger than 1". Go to downtown to buy new dowels was not an option, I'm sure I would have had a very similar crap. In order to fix the dowel I came up with this quick and simple sort of "lathe". I turn on the hand drill with one hand, and use the other hand to rub a sandpaper against the dowel. I find this kind of experiments very funny. It's good to have a wagon vise in my workbench. 
.
.
I applied dye on the dowels, then glue up the thing.
.
.
Just to have more fun in this project, and for better look, it ocurred to me to use wood plugs as an easy and attractive way to hide screw head. I decided to use a very contrasting wood: Ziricote. This time I'm going to shut up and let the pictures speak for themselves:

.
.
.
.
.
.
.
.
.
My daugther, Noelia, approved my work.
.
.
.
Nos vemos luego!!!


[222] CUTTING BOARD

Posted: viernes, 15 de julio de 2011 by Superhero!! in
3

I must confess, being a woodworker hobbyist I'm always looking for new cute projects to build. But sometimes I miss the most obvious ones. That was the case on my wife's cutting board, it was an ugly and worn thing. My wife deserve a new one. So, here I am (a Superhero) to build it.
.
CUTTING BOARD

.
.
Do you remember the top of the kid's table? I built it using a lot of scraps. Mmmh perhaps should say offcuts. Anyway, I have this offcut from the offcuts and didn't want to throw it away... I check its size and noticed it was barely enough for a cutting board. A quick and funny project.
.
This project was intended to keep me from throwing wood. But also a good chance to explore the very famous technique by Marc Campagnoulo for his own cutting board. This is not a copy from his, but based on it (sort of).
I started by crosscuting the offcut into 7/8" wide strips. Each one will be rotated 90° in the next step to expose endgrain, so after flattening and cleaning up I expected to get a 3/4" thick cutting board.
.
Next step is to re-arrange the strips for a nice look. First, each strip was rotated 90° to expose end grain. Then, I flip each second strip up side down in order to create an interesting pattern. End grain surface supposed to be a better one for a cutting board -instead a regular one- because the way the knife and the fibers... blah blah blah... nevermind. 
.
When I'm Ok with the pattern, it's time for a messy glue up. I like to use a plastic foil on my workbench at this time, it's ugly but catches all those glue drippings. I use long bar clamps with a piece of scrap wood for an even pressure distribution and keeping the bars from denting the workpiece.
The real trick here is keeping all those strips aligned. Glue makes things slippery. So, I use leftover pieces of wood (already varnished) clamped on the sides to keep all the strips aligned.

 .
When the glue was dried, I took off all the clamps and found the cutting board was slighty out of square. My table sleed is perfect for squaring stock. A cutting board doesn't need to be perfectly square, but I don't want someone to see it and say it's silly.
 .
This wasn't part of my original idea. I felt the cutting board a bit small, so I ended up adding an end trim. All four pieces are solid stock, and are glued up face to face, so I didn't bother on creating a tongue and groove joint.

 .
I used a super-sophisticated high-tec jig to layout a curve on the corners (a WD-40 can). Then I trimmed on my scroll saw. Damn, I need to get a band saw. How can I explain to my wife that I need ANOTHER tool?? She doesn´t understand me.
.
In between previous steps, I removed the dried glue with a chisel. Then work with a block plane to flatten the cutting board, not so much, just a few passes. I also rounded all edges whit a router bit (on my router table, of course). Now is time for final sanding. Working on endgrain can be tough. A belt sander is usually powerfull enough for the job... and very noisy btw.
.
I have trouble finding an adecuate finish. Obviously, I can't use polyurethane. I found mixed bee wax on sale at the hardware store, but not a good idea because the warning about some toxic ingredients. I know there are some special products for this kind of aplications, unfortunately not for sale in my town. Buying on the internet was a choice but... Just for a small cutting board? I don't think so.
I ended up applying four coats of mineral oil. The kind used for baby care. Not ideal, but better than nothing
.
I had this rubber pads lying around from an old something I dissasembled several weeks ago. They are excelent for this project. I drill pilot holes to prevent wood split.
.
.
One of the first uses we gave to this little thing was cutting lemons. Nou, not for lemonade. We needed lemons -and salt- for a six pack beer.
.
.
Nos vemos luego!!!

[221] BY THE WAY

Posted: jueves, 7 de julio de 2011 by Superhero!! in
1

Hace una semana, una escandalosa moto se estacionó frente a mi casa. A toda prisa, y sin siquiera apagar su ruidoso motor, el conductor hizo sonar su silbato. Es un silbato que ya he escuchado antes. Es el cartero motorizado que cada mes entrega el correo en casa.
.
No, por lo general no me emociona tanto la visita del cartero. Pero al menos me divierte. Mi enorme perro rootweiler le ha dado al menos un par de sustos tremendos.
.
Pero debo confesar que la semana pasada si me emocioné. Mucho.
.
Hace dos meses, en un momento de total estupidez, se me ocurrió suscribirme a una revista. Por internet. De alguna manera me atreví a pagar $29.97 dolares por una subscripcion anual a una revista que se edita, imprime y distribuye en Cincinnati, Ohio. Ciudad que se ubica a 5,000 kilometros de distancia desde mi casa. (metros mas, metros menos).
.
Dije "un momento de total estupidez". Si.
En un momento posterior de lucidez reflexioné y me di cuenta que mis probabilidades de recibir esa revista eran pocas, escasas, casi nulas. Me puse a pensar en las aduanas, en la confiabilidad del correo, en la enorme distancia, lluvia, extravios, robos, y un largo etcetera. ¿Como diablos se me ocurrio pagar una subscripcion anual? Estupido!!!
.
Mi perro estaba en el patio, asi que el cartero llegó con mas confianza a mi casa. Me entregó mi acostumbrada dotación de sobres y me puse a hojearlos sin mucho interes: Liverpool, Bancomer, La hipoteca, Telcel, Santander, Popular Woodworking Magazine, Coppel... Un momento... ¿que? ¡¡¿Popular Woodworking?!!.   Wooow!!!
.
Es una revista en ingles. Pero leer ingles no es ningun problema para mi. Tenia en mis manos nada mas y nada menos que la edicion #191 de Agosto 2011... y apenas eran finales de Junio. I can't believe it!!!
.
La ultima vez que me emocioné tan intensamente con una revista fue... uhmmm... esteee... errrrr... hace mucho tiempo: con mi primera revista porno.
.
De inmediato le heché un ojo a un proyecto: Pennsylvania Spice Box... ¡¡¡Nice!!!
.

Mis habilidades de carpintero son excelentes para copiar o reproducir proyectos publicados con (o sin) planos ó instrucciones... Hacer mis propios diseños aun es un sueño. Pero algun dia, seguramente...

[220] KIDS TABLE

Posted: martes, 5 de julio de 2011 by Superhero!! in
0

Two years ago, I built my first woodworking project. It was a cradle for my daughter. I owned only a few basic tools that fit in a backpack, but my enthusiasm was big enough to compensate the lack of tools... and skills. That cradle took me an incredible amount of time to get it done. I had to solve a lot of woodworking mysteries!!
.
Today I own more tools (never enough ha ha ha) and more woodworking skills. My daughter is growing very fast, wich means more furniture required -that I'm very pleased to build-. This time, I built a kid's table in just a few days...
.
Kid's table
.
This project is based on Matthias Wandel post. He designed and built the children's table using his own amazing jigs and machines: A wooden bandsaw, slot mortising, tenon jig, table sled, router lift (and more). One year ago I purchased his router lift plans, they are very nice and detailed. Building the router lift was a learning experience for me.
.
For the kid's table I use the same design and proportions described in their free plans. Despite his detailed description on how to build it, I have to work my own way. I don't have a fully equipped workshop, so I need to figure out how to perform certain tasks according to what I have.
.
.
To make the top I used almost all the wood in my scrap bin. This is an idea that ocurred to me from here. I ripped all these strips the same width, then glued up to make a long board 10" width that I can pass through my thickness planer. However, matching the grain direction on each strip is almost impossible. It's good to have a belt sander handy.
.
I crosscut that board and then glued up again to make the top. I also added a hard wood trim around the edges. For the edge grain I simply glued up face to face. For the end grain I used a tongue and groove joint, but I forget to take that picture, oops!. I hope the end trim pieces add strength, I wonder if seasonal wood movement will be an issue. For a perfect fit I used the trick of relative dimensioning.
.
While the stock still square, I cut mortises on the legs. I wish I had a fancy mortising jig, instead I use this approach on my router table. I did very light cuts moving the stock over the router bit until hit a stop block clamped to the fence.
.
I have plans on building a tenon jig. I found a really simple design on the web, but I have been lazy. In the meanwhile I keep cutting my tenons using my table saw sled. The most-left clamped block has a drywall screw for microadjusting. The next clamped block to the right is for resting the workpiece. And the most right free block is for pushing the workpiece tight while the sled passes through the blade.
This works fine for short-medium workpieces, It isn't super precise but it's acceptable. Some paring is usually needed. I have no problem on that.
.
Cutting the tenons shoulders is quick and easy after a quick setup.
It's good to keep some scraps handy for test cuts.
.
I have a lot of jigs in my To do list. One of them is a taper jig. The point here is I cut tapers very sparingly, so I refused myself to build a fancy one. But when you need a jig... YOU NEED IT. I came up with this quickly (and disposable) jig to cut the tapers on the legs. Its a simple sled running against the fence, supporting the workpiece at the correct angle. It is based on this tip
.
I layout the cutout on the bottom edge of the apron rails the same way Matthias did. I also used a can of WD-40 to mark an arc on the top's corners to round them off. (That's high tec!!). But instead using a bandsaw, I used a scrollsaw
I used my router table (equiped with my router lift) to round all edges... piece of cake!!
The glue assembly described by Matthias is very straightforward, I was able to follow it exactly the same way.
.
I applied oil-based polyurethane varnish to bring out the wood’s natural color. I brush two sealing coats, let it dry all night long, then use a card scraper and/or sand paper before moving on. Finally, brush on three thin coats of finish to get a smooth, glossy surface. I hope this varnish keep moisture away and reduce seasonal wood movement issues.

.
Ahhh, por cierto.
Espero que mi Ingles barato no cause demasiadas carcajadas.
Estoy redactando mis post en ingles porque creo que es una buena forma de practicar.
La practica hace al maestro ¿a poco no?
Aún tengo mucho que aprender... de ingles y de carpinteria.
See you latter!!!