[232] TRESTLE TABLE Part II (Tabletop)

Posted: lunes, 3 de octubre de 2011 by Superhero!! in
1

Oh, there is a lot of work to be done at the office (I have a job at the Ministery of Education, remember?). There wasn't time to write any blog entrie in the last two weeks. It's always the same in this time of the year. But I'm back...
.
In previous post I described the construction of the table base. This entry will describe the construction of the table top.
.
Trestle table: TABLE TOP
.
.
.
.
In the previous post I mentioned that I had decided to use lumber from an urban mahogany tree to build a trestle table. I stored that lumber for 13 months so I'd considered it barely dry enough. My friend Rosalino used his chainsaw without any guide, just freehand so I got a rough kind of chunk!!
My first step was to cut a few inches from the ends because I wanted to know wich side is the bark side and wich side is the heart side. -Why this?... "Because you should plane into the points of the cathedrals on the bark side; and plane in the same direction as the cathedrals on the heart side". -More on this later.
.
.
I start the milling proces focusing on getting only one face of each board flat. It doesn't need to be smooth, just aproximately flat. Winding sticks are very usefull for this because they exagerate any warp or high spots on the board's face. You can see in the left picture that I began with a few diagonal passes. Skewing the tool slightly during the cut makes it easier to push and does assist in flattening. I then switch to long grain passes.
Once I get one face flat I pick my boards to a workshop equiped with a 15" wide planer and pay for the service because my own planer only accepts up to 12" wide boards.
.
.
Unfortunately I wasn't able to use these boards on its full wide (around 14") because I found bark and knots on its edges. I decided to trim the boards to 12.5" wide so they can barely pass trough my thicknes planer for a last smoothing pass.
In the picture on the rigth you can see that I feeded my boards with the cathedrals pointing away from the cutterhead because that was the heart-side of the board. That's supposed to be the right way to do it, but these boards had some wild and reversing grain, so I couldn't avoid tearout in few small areas.
.
.
I choosed a design for the table top that include two wide boards and a narrow center piece (mahogany). There are also two thin dividers, and two end trim (ziricote). This array involve 6 butt joints that can be very dificult to keep aligned during the gluing process, so I choosed to do the glue up in 3 stages.
I started by gluing the mahogany centerpiece and the two thin dividers... piece of cake!!


In the left picture you can see a couple 2x4's that I use to spread the clamp pressure more evenly.
.
.
In the stage two I glue the wide boards and the ziricote end trim together (picture on the left). Working in stages is more time consuming, but there is less stress and higher chances to get every thing right. For the final stage I only had to glue up three big pieces, and only had to keep aligned two butt joints. (picture on the right)
The whole table top is now very heavy and I didn't want any risk of joint failure, so I waited a full day to allow the glue to harden before handling the table top.
.
.
As you can see in the next picture, I leave the pieces long until after the top is glued together. This allowed me to slide them back and forth until the best match is achieved. But now is time to cut it to lenght.
I can't imagine a table saw big enough to handle a table top this size, so I guess even a profesional woodworker has to deal with a jig and a circular saw for trimming the ends of a table top. I hate circular saws because I always had trouble to get a clean and straight cut with them. But I found this jig on the web and I gave it a try. I had a big smile on my face when my cut was done. It's really easy, just lay out the cut, clamp down the jig, pick up your circular saw and make the cut.
.
.
Now is time to work on the Ziricote breadboard ends.
I decided to install breadboard ends to allow seasonal wood movement and keeping the table top flat. The battens are mortised to receive four separate tenons for strenght. Stub tenon ensures alignment of batten and tabletop and keeps the table top from warping.
Ziricote is a hardwood, a very hard one, so cutting a groove in a batten is best done on the tablesaw (pic on the left). For best accuracy I take multiple cuts with a standard blade and then finished the groove on the router table, this way there was minimum material to be removed with the router bit (pic on the center). 
While the router table still set up, I cut four mortises on the battens. I raise the router bit only 1/8 in. on each pass and move the batten back and forth keeping it tight against the fence. I drew some reference lines on the fence as a guide to know when to stop (pic on the right).
.
.
Once the groove and mortises on the battens was done I moved on to the table top to work on its ends.
#1: I set up my plunge router with a guide and a straight bit to remove waste from both sides.
#2: Then I use a hand saw to cut the tenons shoulders.
#3: A coping saw is an easy way to remove the waste between tenons
#4: The finished tenons and stub tongue
.
.
The pair of center tenons will be glued and pegged into their mortises, but the only thing holding the batten to the table at the outside tenons are pins, wich I drawbore slightly and drive through elongated holes in the tenons to allow for wood movement.
Please ignore the mess, and keep an eye on the elongated holes and the pins
.
.
I know this is a long blog post, but we are almost done...
I have experienced a lot of troubles with wild and reversing grain on these boards, so I preferred to  put aside my smoothing plane and turn on my belt sander. Oh boy, I can't find the damn dust colector bag, it's lost and I ended with lots and lots of dust everywhere. (pic on the left)
Next step was to cut a  roundover on the edges of the table top, but I wanted a very small radius roundover. Instead of buying a new router bit, I set up my plunge router to use only the concave portion of a moulding bit that I bought when I built the pennsilvanya spice box (pic on the right)
.
.
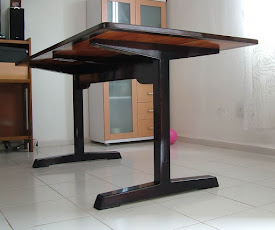
This is what the table top looks like after finishing.
As usual... Oil based polyhuretane.
 I secured the top with screws. Drilled clearance holes throug the braces and reamed them out to allow the top to expand and contract..
.
Then my wife came to watch the finished table and asked me a question:
Are you going to build a set of chairs, too?
.
.
Duh!!!

[231] TRESTLE TABLE Part I (Base)

Posted: jueves, 15 de septiembre de 2011 by Superhero!! in
2


Today is a holiday here in México. Tonight we celebrate our Independence day. I'll eat pozole and to drink lots of tequila: Viva Mexico Cabrones!!!. So, tomorrow I will not be able to write any post, or hold a saw, chances are I won't be able to get up from bed.
.
The trestle table project will be in standby... The table top is already assembled, but in the middle of the finishing process. However, the base is already done... And only the base is enough to write a post.
.
.
Trestle table (the base)
Each end of the trestle table has a foot, leg and brace. And these end assemblies are joined by a long stretcher. The leg and foot are joined by a wedged through-tenon. The brace and leg are joined by a bridle joint. And the two end assemblies attach to the stretcher with a big wedged through-tenon.
.
.
13 months ago a company built a new lane in the street where I live. Unfortunately, a huge mahogany tree was in the way of this new lane. Bad news was that the company decided to remove such a beautiful tree instead of build the new lane around it. Good news are that the company threw away the log and I was able to reclaim lots of lumber... For free!!. My friend Rosalino brought a chain saw and helped me a lot.
After 13 months I decided to use that lumber... and to build a trestle table.

.
.
My first major challenge was to cut that timber into manageable pieces. It has an odd shape and was too heavy for my ridiculous benchtop table saw. So I used a circular saw to start with a kerf as deep as the circular saw was able to cut. Because the odd shape of the timber I wasn't able to cut another kerf from the other side (faces not parallel). So, there was almost 1.5 inch left to be cut with hand saw. That was tough, and I finished that job riding like a cowboy.

.
.
Once I had a manageable size, the next step was to flatten one side. I used my fore plane (jack plane) to plane off the high spots until the board was reasonably flat. Then I pass it through the thickness planer with the approximately flat side down. After that, flip the board upside down and pass it through the thickness planer again to smooth out the approximately flat side.
Once the faces are true and parallel, I worked on one edge to get it straigth and squared -but I forget that picture.
.
.
With one edge straight and square I was able to pass it trough the table saw to cut the workpieces to width. I considered 1/16th wider because I like to give a final light pass through the thickness planer to smooth it out. After that, I cut the workpieces to final lenght with my miter saw.

.
.
From left to right:
1. The brace and leg are joined by a bridle joint
2. The leg and foot are joined by a wedged through-tenon.
3.  End assemblies dry fitted.

.
.
At this moment, the end assemblies looks like a simple "H". It needs some details to transform it into something more interesting to look at. I cut tapers on the feet and brace. Then I crosscut the ends of the feet at 25° using a miter saw. I also cut a relief on the bottom of each foot to create two pad feet on each foot -not pictured.
.
.
Wedging a mortise and tenon joint is something I have never tried before. And I found that it is something really easy to do. Wedges: First I need to make some wedges, I selected Dzalam wood because it can take a beating without spliting. The wedges are 8° taper, thats really easy to do, just set the miter gauge in my table saw at 4° and turn the blank upside down after each cut.  Kerfs: I cut two kerfs in the tenon located 1/4" in from the edge cheeks and run 3/4 of the way down to the tenon's shoulder. Mortise: There is a slight trumpet shape in the mortise so the wedges will spread the tenon at the wider opening. Simply chisel away a little from the two ends of the mortise where the tenon exits. Cleaning. I let the glue dry overnight, then I cut the waste using a chisel to get the tenon flush matched

.
.
After a roundover on every possible edge I do a final dryfit just to be sure every thing is ok before gluing the long stretcher.  The two end assemblies will be attached to the stretcher with a big wedged through-tenon. At this time a pair of small hands came to help  :)
.
.
.
As you can see in the top first picture, I decided to dye the table base. Why?
.
This mahogany wood came from an urban tree -as I mentioned above. Urban trees usually grow under a lot of stress, and that is reflected in the wood. I found some injuries, and a very wild grain. The wood shown too many details that may distract the attention from the main element: the table top. So I decided to standardize the color of the table base and make it more discreet
.
.
.
The tabletop will feature two gorgeous boards from the same mahogany tree, a beautiful Ziricote end trim and breadboard ends, so stay tunned.
.
.
Nos vemos luego!!
.

[230] MAHOGANY

Posted: jueves, 8 de septiembre de 2011 by Superhero!! in
0

During the last two weeks I have been working on a Trestle Table. A proffesional woodworker would say that this is a medium size project, but I'm just a hobbyist woodworker, for me it's a huge project and I'm taking my time to work with no hurry. The trestle table will be finished next week, so I hope to write a post about it soon. As usually, I'm using local Mahogany wood.
.
I live in Quintana Roo -that is at southeastern's Mexico. In this area we have acces to a lot of tropical and exotic wood: Ziricote, Chakte-viga, Katalox, Dzalam, Machiche, Sapodilla, Chechen, Granadillo, Jabin, and the list can go on and on... However, the most used and most popular is Mahogany wood.
.
I know that the name mahogany is used when referring to numerous varieties. To be honest, I always slept during my biology class. I don't have any idea about wich varieties of mahogany trees are growing in my area. I only know that people call it "Mahogany".
.
.
Couple of days ago we had the visit of our Governor here at the instalations of the Ministry of Education - I have my office job there-. There was a meeting in which the Governor made the symbolic delivery of furniture to public schools. He told us that this is a special project to create local jobs, to exploit our natural resources and obviously to provide quality furniture to public schools. He noted that only local companies were contracted.
The message was that the money stays at home and that all benefits are for our community.
.
.
He told us that 3,500 pieces of furniture were made with mahogany wood. Dimensions and spec were provided by the Ministery of Education to ensure durability and comfort to students. This was a total investment around 6 million pesos ($480,000 USD). He also noted that he was very pleased with this project, so that authorized another $480,000 USD to build another 3,500 pieces of furniture in the coming months.

.
.
When the meeting ended, I was glad to have a chance to inspect the pieces of furniture. I like the polyurethane finish, It looks nice but I'm afraid that teenager students can be tempted to register their marks on those nice wooden surfaces. I hope that these nice student chairs will find a careful owner .
Student chairs
 .
.
In general, I think the design of these furniture is austere. There is no ornamentation, and I think that's fine. School furniture doesn't need to be more expensive because ornamentation, but should be strong and sturdy because they are likely to be abused.
There is no plywood on these furniture. All panels are solid mahogany wood.
Teacher desks
.
.
Bookshelves
.
.
 Kindergarten, Table & 4 chair
.
.
I have heard some folks in the U.S. who have bought Mahogany at incredible high prices up to USD $9 / BF.
.
The highest price I have found for mahogany here in Quintana Roo is USD $3 / BF for standard quality wood. However you can also find mahogany in lower quality for just USD $2 / BF, at this price you can also get the standard quality but in shorter lengths.
.
.
.
I apologize for the poor quality of the images. My digital camera stayed home and had to take pictures with my cell phone camera.
.
Nos vemos luego!!!

[229] WAGON VISE

Posted: lunes, 29 de agosto de 2011 by Superhero!! in
5

Sometimes a single theme seems to be everywhere, you'll see...
1. Yesterday I read this post about wagon vise design.
2. Today I got an e-mail with a comment from somebody else about my own wagon vise.
3. Today I found this post about living without any vise on the workbench.
4. Today I noticed several visits to this post, here in my blog, where I partialy show my wagon vise
.
And then it occurred to me to write a quick post with some details about my wagon vise.
And yes... this is another english exercise for me, remember I'm a spanish speaker, my english have a lot of mistakes and may be you can't understand me, so I try to compensate with a lot of pictures.
.
WAGON VISE

I live in a region where buying a nice wagon vise is not possible. Hardware stores in my town are far far away from selling specialized woodworking hardware. Buying in internet was a choice, but international shipping charges are to high. And there is no fun on clicking a mouse to get a tool, I prefer to click on my power tool's trigger to build my own stuff.
 .
.
.
When I glued the strips for my table top, I considered 5 strips shorter to get a proper space for the wagon vise. Once the glue was set, and after flattening the table top I cut an edge rabbet on the bottom of the table top. I used a straight bit mounted on my router and then used a chisel to square the ends. Note the groove on the end grain of my table top, I'm going to install a tongued end trim there, but not yet... more on that latter.
(Here you are looking the bottom of my table top)

.
.
I needed the help of a blacksmith to weld this sort of guide. It's a standard nut welded to a flat steel bar. There is a hole in the flat steel bar so the threaded rod will engage the nut and pass through that hole without binding. I painted the guide black (against rust) and drill countersunk holes for mounting screws. I don't how to call this piece, so let's call it as guide nut... :$
.
.
The bench dog runs mounted between two steel runners. The two runners are flat steel bar with countersunk holes for mounting screws, that way I'm going to be able to disassemble the wagon vise if any bad thing happens in the future. I cut the grooves in the bench dog on the table saw, I used an external blade from a dado set. I was afraid about binding but the bench dog ended running very well and no lubricant was needed, just a loose fit.
 .
.
Do you remember the tongued end trim? I need to do some work on it before installing it.
I drilled a hole with a forstner bit at the drill press because I wanted to be sure it was perpendicular. The hole is the same diameter as the hole in the flat steel bar, -behind the welded nut. That hole size should allow the threaded rod to pass through freely.
.
.
After installing the end trim I used the previously drilled hole as a guide to complete the hole through the rest of the wood. In this case I had to use a spade bit because the forstner bit was to short
.
.
The threaded rod will pass through the previously descripted hole, it will be fix in place with the "guide nut" and then will met the bench dog.
How does the threaded rod met the bench dog? I believe this picture will explain much better than me.
.
.
I used a standard threaded rod, so I will need a lot of turns to move the bench dog from one position to another. So I drill two dog holes in the bench dog because it is faster to move the bench dog than to wind the screw. I'm glad I did that.
 .
.
Another great feature on my wagon vise is the big wooden wheel.
The nut in the next picture is locked in place with a removable pin. The pin is the shank of a longer drywall screw (I cut off the threaded section). The pin sits flush in a countersink hole. I chiseled the shape of the nut in the center of the wheel just half of the width of the wheel. The wheel is locked in place with a washer and a nut -from the other side.
I love this wooden wheel. I only need to give it a hard push/pull and it will remain spinning a while -doing the most of the winding job thanks to the inertia.
.
.
I positioned the dog holes in my table top with not so much space between them. Do you remember the two holes in the bench dog? I have plenty of dog holes so I don't need to move the bench dog a lot. And that's the best part!!!


.
.
 I'd like to hear what you think...
Nos vemos luego!!!!

[228] SPICE BOX (part IV) FINISH

Posted: martes, 23 de agosto de 2011 by Superhero!! in
1

Finally, last week I finished the Pennsylvania Spice Box.
.
I decided to build this project because I liked the design and proportions, it also interested me because its a reproduction from an 18th century spice box. But the main reason I was motivated to build this project was that I noticed a few techniques that I don't know. So I had to search for info, learn about and work on it in order to complete this project: Resaw wide boards, hand cut through dovetails, hand cut half blind dovetails, ogee bracet feet, mouldings and a nice double arched door was new stuff for me. This project was a challenge for me, I enjoyed it, and I learned a few new techniques...
.
.
PENNSYLVANIA SPICE BOX
.
I decided to use mahogany for this project because I don't have acces to curly maple. Here in southeastern Mexico I can find a lot of native exotic wood species, they all are so beautiful and relatively cheap but in most cases they are so dense and work with them can be tough, (specially if you are learning new techniques). Mahogany is easy to work with, so I decided to go on mahogany. But I'm a little sorry I made that decision, by the end I'm just a little dissapointed about how the color and grain turn out, specially if I compare my finished Spice Box with the one showed at Popular Woodworking Magazine.
.
.
For the hand cut through dovetails that join the main carcase I did some changes. The original plan by Glen Huey indicates to lay out the tails on the sides and the pins on the top and bottom and I'm sure that that is the right way to do it, but that configuration results in a boring series of rectangles on the upper show face. If I'm going to dedicate time and effort in dovetails I would like to show it off, so I decided to lay out the tails on the top and bottom so I can say very proudly: Look at my dovetailed joint!!!.

.
.
There are 11 drawers wich means 22 half blind dovetail joints at the front and another 22 through dovetail joints at the back of each drawer. All of them made by hand. Dang... that was a time consuming task. It took me around 2 days to complete only the half blind dovetail joints for the fronts of the drawers... then I gave up myself and cheated on the joints for the backs. I power up my table saw and my router table and joined the backs and the sides of each drawer with a locked rabbet joint in just a couple of hours.

.
.
To cut the arches for the double arched door I looked for my biggest hole saw but it was 1/4" smaller than the size in the original plans. I had to choose between a right sized -but not perfect- semi-circle with my scroll saw or a smaller semicircle with my hole saw. I choosed the smaller and perfect semi-circle with the hole saw.
I have a set of frame-and-panel router bit and it ocurred to me to use the "female?" router bit from that set to cut the slot for the panel and the moulding at once. (in several light passes, of course)
.
.
I have already described how I dealt with the ogee bracket feet in this previos post.
Mouldings: I followed Glen Huey's directions from the article in the magazine to cut thicker mouldings from a smaller router bit and everything worked fine but...
When I went to the hardware store to buy the router bit I picked up the wrong one. It doesn't make any sense to spend more money and buy another router bit just to match the identical profile like the one used by Glen Huey, so I used the one I have already bought. By the end my mouldings are... mmmh?... just a diferent model.
.
.
The back of the Spice Box is nailed to the sides... 
.
.
There is a secret compartment behind these drawers... Check this out:
Uh, may be it's not a secret anymore... ups.
.
.
And the center drawer also have a secret compartment. A false bottom.
(The drawer is upside down...).
.
.
The whole project took me three weeks. The first week I dedicated only a couple of hours a day after my office job, but after that I got two weeks of vacations, so I had plenty of time.


Pennsylvania Spice Box... Done!!
.
.
.
You can also read:
Part IV: Finished project

[227] SPICE BOX (Part III) OGEE BRACKET FEET

Posted: martes, 16 de agosto de 2011 by Superhero!! in
1

I have already finished the Pennsylvania Spice Box project. But before showing the pictures on the finished box, I'll write one last post about another new technique that I had to learn. This time is the case for Ogee Bracket Feet.
.
OGEE BRACKET FEET
.
I started the ogee bracket feet construction by drawing a template. I drew it in AutoCAD program and printed in autoadhesive paper. Then I stick it to a scrap piece of plywood and trim it at the scroll saw. The idea is to get a template that I can use more than once. I also milled four blanks, each one will yield two feet halves.
.
.
I worked the joinery in pairs because working with longer pieces is easier than working with short pieces. I tilted my saw at 45° and cut a miter on each end. With the saw still at 45° is a good idea to cut a groove for a spline, just adjust the saw blade's heigth and make some test in scrap wood.

.
.
Use the template to transfer the shape on the workpieces, be sure to keep the template tight to the edges. I had to do some eyeballing to find the center of the semi-circle that forms the spur and draw a dot in place.

.
.
Next step is to cut the feet halves. First use a forstner bit to drill a hole in order to get a sharp spur (using the eyeballed dot), then finish the cutting job at the scroll saw.
.
.
Note the grain direction on the spline. The spline is a great help to keep the pieces aligned but I didn't find an eficiently way to apply clamps... The ogee shape is very odd for clamps... Dang, that's a huge and embarrasing gap, fortunately is not a show area so nobody will see it.
.
.
The outside face of the feet has a particular profile, one part is concave and the other part is convex. With a band saw this should be straightforward, my problem is that I don't have a bandsaw. So I scratch my head and then it ocurred to me to cut the concave part of the profile using the cove cutting technique. This worked very fine so I was very proud of my discovery, unfortunately after a couple of days I found this article in the web, so my discovery wasn't new.  dang!!

.
.
But still had to solve another problem. There's a convex part to be done to complete the profile. What to do? I scratched my head again but nothing happens. So I got a beer, then another, and another and... vualá!! Inspiration arrives. Lay out some lines and then used my block plane to cut a "big chamfer". Check this out:

.
.
With the "big chamfer" finished the next step was to "soften" the profile. A few additional passes with the block plane, a little sanding work and I was done.
.
.
Once installed, the ogee feet should be reinforced. I glue up a vertical wood block to carry the load and two horizontal ones to reinforce the grip of the feet to the box. It looks odd to me, but I found similar approaches like this on the web so I believe it's right.
.
.
I know my ogee feet are not perfect. But I enjoyed exploring and learning this techinque,-this is something I had never done before-. My ogee bracket feet are good enough for me and that's all I need. :)
.
.
.
You can also read:
Part III: Ogee bracet feet
Part IV: Finished project